
Looking for a creative and personalized way to express your style? Or want to learn how to make your own jewelry? Follow me, I will share some bead bracelet ideas and show you how to make it.
Creating your own charm bracelet with beads is an excellent choice for those seeking a personalized and meaningful piece of jewelry. By carefully selecting beads that resonate with your personality and interests, you can craft a one-of-a-kind bracelet that holds sentimental value. In this step-by-step guide, we will walk you through the process of making a charming bead bracelet that reflects your unique style and story. We will begin with a basic and simple bead bracelet idea, allowing you to build upon it and add your creative twists along the way.
Step 1: Gather Your Materials
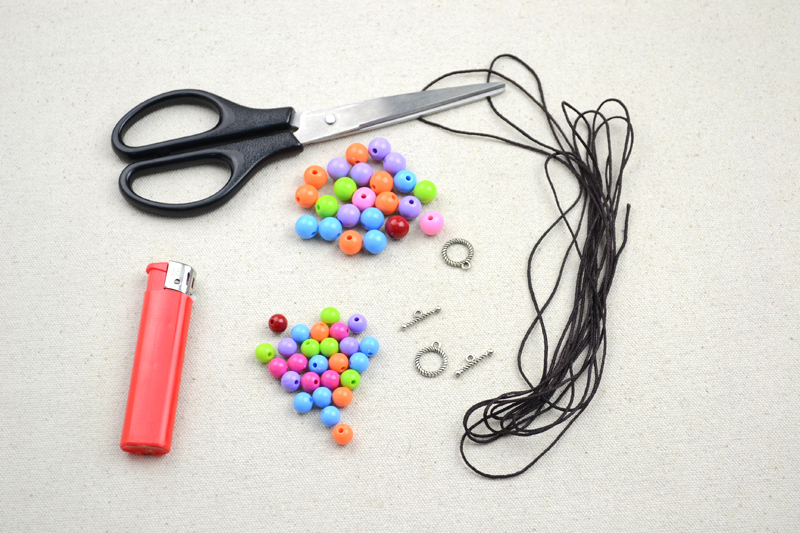
To get started, gather the necessary materials, for example:
Beading Wire or Thread: Depending on the desired style and durability of your bracelet, you may pick out to use beading wire (such as nylon-coated stainless steel steel wire) or beading thread (such as nylon or silk). These materials provide a strong innovation for your beads and ensure longevity.
Bead Stoppers: These W. C. Handy tools are designed to hold your string of beads in aim on the wire or thread while you work. They keep the string of beads from sliding off and help maintain your design.
Crimp string of beads or Tubes: pinch beads or tubes are old to secure the ends of the wire or thread, providing a neat and secure finish to your bracelet. They are flattened exploitation crimping pliers to hold the beading wire or thread in place.
Clasps: look at using a clasp to fasten your bracelet. There are various types available, such as lobster clasps, toggle clasps, or magnetic clasps. Choose one that suits your design and preference.
Bead Caps: Bead caps are decorative components that put up add an extra touch of undefined to your design. They are often old to frame and accentuate big beads or to create a professional finish to your bracelet.
Spacer Beads: Spacer beads are smaller string of beads that are used to split and foreground the briny beads in your design. They provide visual matter to and serve make a balanced and cohesive look.
Beading Needles: If you’re exploitation beading thread, a beading needle can be helpful for threading smaller beads or navigating through tight spaces.
Bead Board or Mat: While not essential, a bead board or mat put up assist in organizing and laying out your string of beads during the design process. It typically has sections for arranging string of beads and measurement markings to ensure your bracelet is the desired length.
etc. There will be more materials than these shown above, it depends on the bead bracelet ideas of yours.
Step 2: Plan Your Design
To ascertain a made outcome, it is essential to plan your bracelet design earlier you begin stringing the beads. Lay come out of the closet the beads and charms, allowing yourself to experiment with various combinations. debate on color palettes, patterns, and the overall balance of your design. This step allows you to visualise how your bracelet will appear and ensures a cohesive and esthetically pleasing result.
Step 3: Stringing the Beads
With your design finalized, it is time to proceed with stringing the string of beads onto the bracelet chain. Start by exploitation pliers to open a startle ring. Slide the start ring onto the chain and then firmly close it. start by stringing your first bead onto the chain, followed by other jump ring to make it in place. Continue this process, alternating between beads and jump rings until you have added altogether the desired elements to your bracelet.
Step 4: Adding the Charms
Now, it is time to heighten your watch bracelet by adding the charms. Open a jump ring, slide it onto the charm, and then attach to it to the bracelet chain. Ensure the jump ring is tightly closed to keep the charms from coming loose. Repeat this process, adding the charms reported to your design plan. Aim to undefined them evenly passim the bracelet to maintain poise and symmetry.
Step 5: Finishing Touches
Once you have added all the beads and charms, take a moment to review your bracelet. set some loose jump rings and rearrange the beads if necessary to accomplish your desired look. Trim any surplusage chain, ensuring that the bracelet fits well on your wrist. Pay care to the final details, ensuring that each component is securely attached and that your creation truly reflects your vision.
By following these steps and allowing your creativity to flow, you can create a charming bead bracelet that tells your unique story and showcases your personal style. Remember, this basic idea serves as a starting point, and you can always expand and experiment with different bead materials, colors, and design elements to make your bracelet truly exceptional. Enjoy the process and embrace the opportunity to express yourself through your handmade creation.
Practice
And now let’s try to make a real one. How about a “Sunshine Bracelet”? Here’s the idea for a cheerful and colorful bead bracelet:
Materials:
- Colorful beads, such as yellow, orange, blue, and so on.(Choose various shades and sizes for added interest)
- Charms (Chose those matches the beads)
- Small gold spacer beads, this is for seperate different set of beads.
- Elastic cord or beading wire
- Jewelry findings (jump rings, lobster clasp, crimp beads, etc.)
Pls follow the steps below:
- Measure your carpus and issue the elastic cord or beading wire to the craved length, leaving a few spears carrier inches for tying knots and attaching the clasp.
- Begin by stringing a small atomic number 79 spacer bead, followed by a yellow bead, then another gold spacer, and an orange bead. take over this model until you strain the desired length or have used whole the beads.
- Once you have strung all the beads onto the string, ensure that the bracelet comfortably fits around your wrist.
- Tie a procure knot with the ends of the cord or wire, making sure it is tight enough to throw the bracelet together.
- If using rubber band cord, you can secure the knot with a spend of clear paste or a crimp drop for added durability.
- Attach a jump ring and lobster clasp to one end of the watchband to create a closure.
- Trim whatsoever excess cord or wire, and your sunshine watchband is ready to wear!
This bracelet will bring a bright and pollyannaish touch down to whatever outfit, perfect for summer or anytime you need to add a pop of color. Feel free to customize it by adding charms or incorporating strange bead colors that you love. Have fun creating your sunshine bracelet!
Creating your own charm bracelet with beads is a wonderful way to express your creativity and showcase your subjective style. By pursuit this step-by-step guide, you’ll be able to craft a unique and meaningful bracelet that tells your story. Not only wish you have a stunning accessory, but you’ll besides have a tangible monitor of your interests, passions, and cherished memories. After gather your materials, let your imagination run wild, and enjoy the fulfilling experience of making your really own charm bracelet with beads.